
Flip in Stile — Part 3: Making your first video!

Alright, so you’ve decided that flipped learning is something exciting that you want to try in your classroom and you’ve got all the gear you need to make it happen.
In this post, I’ll outline how to quickly and effectively create a fantastic screencast video that will help students get the most out their time, but first, please take a second to read these words of wisdom by flipping pioneers Bergmann and Sams:
“Before you jump into video production, carefully consider whether or not a video is the appropriate instructional tool for the desired educational outcome. If a video is appropriate, then proceed with planning one. If a video is not appropriate, then do not make one just for the sake of making a video. Doing so would be a disservice to your students and would be a prime example of “technology for technology’s sake”.”
— Jonathan Bergmann and Aaron Sams
Some information might be better presented in searchable text format, with a table, graph or simply in person. However, any subject or year level can benefit from flipping. Here are Bergman and Sams again, this time in a fun video:
If a video is indeed the way to go, let’s get cracking.
This blog post is broken down into three basic steps: planning, recording and editing.
Planning
Arguably the most important part, this is when we decide what exactly should be in our video! A good idea would be to take a close look at the curriculum. Discuss specific teaching points with colleagues and then decide on a way to present the material. This may not be the same way as it would be presented in class, as the format can be mixed up with all kinds of other media, so it’s a really good idea to write a script! This can be:
- a basic checklist of things to mention
- a methodical storyboard of exactly what needs to be in which shot or
- a verbatim script, with each word spelled out!
Since the camera doesn’t need to be on us the whole time (or at all!), we can happily read off a script and no-one will know any better.
A word on ‘winging it’
I used to wing my screencasts without a script and just a basic lesson plan — I’m an experienced classroom teacher after all! However, those videos ended up waaaay too long, with lots of needless repetition, meandering elaborations and tangents that simply didn’t belong.
Writing a script may sound like a lot of work, but in the end, it will not only save recording and editing time but also result in a much more polished video that you will be happy to use again!
The good folk over at TechSmith (the makers of Camtasia) have put together a great short video on planning:
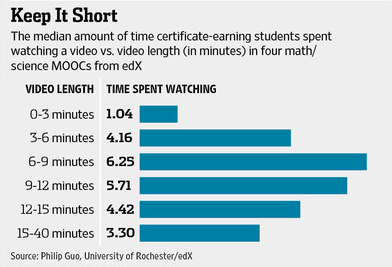
Keeping the videos relatively short means they’re not too taxing on short attention spans (especially for primary school students). Bergmann suggests 1–1.5 minutes per grade level but even that might be too long for older children. Recent research suggests that
“student engagement of any video maxes out at six minutes. Most students spend about three minutes viewing videos longer than 15 minutes, but will watch almost the entire video if it’s no longer than six minutes.”
— Philip Guo, Assistant Professor of Computer Science at the University of Rochester
If possible, collaborate! It’s a lot more fun with a team, leads to better student achievement and a second or third pair of eyes on scripts makes for a better end result. This blog post by video specialists Wistia contains lots of handy tips on scripting, especially when collaborating! The post is aimed at marketers rather than teachers, but most ideas still apply for educators as well and the video in it is especially worth watching!
Preparing Visuals
I generally like to use Keynote or PowerPoint as the medium for my screencasts. I pop whatever reference material (mostly lots of images) I need in my presentation and run it in full-screen on my laptop.
My preference is to have little to no text if possible and represent things with images, graphics or B-roll (a.k.a. cutaway) footage instead. I get images from Pixabay for free or Dollar Photo Club for, well, a dollar. Google Image lets you filter image search by licence as well which means it filters out copyrighted images for you.
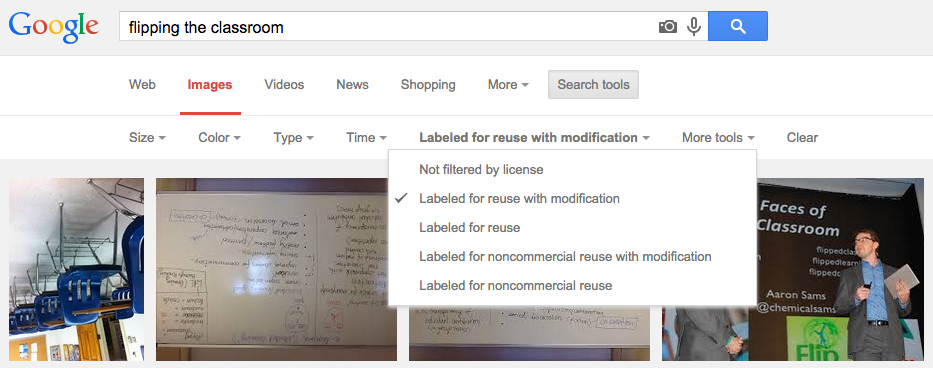
Google images’ search tools can be filtered by licence — attribution is still required though!
That said, I have found that by the time I’ve found a decent image this way and added my attribution, it would have been more time and cost-effective to just use Dollar Photo Club…maybe you can convince your school to get an account?
Recording
If using screencasting software like Camtasia or Screencast-o-matic, it’s a good idea to do a few test runs first to get familiar with the way they work. Here are the guys from TechSmith again with another helpful video:
Not doing a screencast or want to capture your gorgeous self on a webcam as well as the screen? Wistia have made another great video on the topic which I’ve posted here. The link under the video contains lots of handy tips for recording video as well if you prefer reading over watching.
Timesaver tip: if you make a mistake, just stop and start again from the last paragraph/point — you can easily cut the bloopers later!
In the next post, I’ll go over a few fun ideas of what’s possible here, but for now, let’s leave it at that and move on to…
Editing
Professional screencast tools like Camtasia or ScreenFlow have editing software built in, but most free options like Screencast-o-matic or QuickTime Player require video editing software. See my previous post for recommendations.
Editing can easily become a time sinkhole. The key is to work fast and not worry about perfection:
- get rid of bad takes and bloopers with quick cuts
- potentially eliminate slow or less engaging parts
- cut out jarring ums and ahs
- insert any graphics, annotations or arrows required (these can be copied and pasted as well to save time)
- done!
I move on quickly and these days and I find that re-recording a sub-optimal part is often faster than spending a long time editing around it. Again, I quickly got a lot faster here, both with editing and re-taking parts — practice makes perfect!
Many first-timers in video editing get drawn to effects and transitions because they look like a lot of fun — and they are, but also get old very quickly and tend to distract from the actual teaching, so please use them sparingly!
The final result
Before releasing the video to students, it’s generally a good idea to get someone else to watch it who will give honest feedback. Spouses, friends, colleagues, pets…ok, maybe not pets, but having at least someone else doing a quick quality check is really helpful, even if they only answer these two questions:
- What can be cut? (more concise = generally better!)
- What needs additional info/graphics? (arrows, a map/diagram, a quick video of you inserted), etc.
If the changes are easy to implement, go for it! These videos can be re-used if they’re good, so it’s worth getting them to a decent standard. If they require a complete retake, take the feedback into account and avoid making the same mistakes again in the future. Videos can be dropped right into Stile (with the added benefit of only your students being able to view them) or uploaded to the video hosting provider of your choice (YouTube, Vimeo, etc).
Now it’s your turn! Feel free to ask questions or share tips that worked for you in the comments below!
In the next instalment, we’ll take a look at what to now do with those videos: embedding them, purring in concept checking questions, and more. Then in our final part, we’ll show you how it doesn’t all have to be serious and how you can have fun with these videos — props, green screen video and more!